引用参考:https://juejin.im/post/5821c24e570c350060bef4c3
环境说明:
windows 下4台服务器,真实机IP:192.168.2.107,其中
| 服务器 |
IP |
说明 |
| nginx1 |
172.17.0.3 |
nginx服务器1 |
| nginx2 |
172.17.0.4 |
nginx服务器2 |
| server1 |
172.17.0.5 |
服务器1 |
| server2 |
172.17.0.6 |
服务器2 |
| server3 |
172.17.0.7 |
服务器3 |
1
2
3
4
5
6
7
8
| C:\Users\mma>docker ps
CONTAINER ID PORTS NAMES
73e6f2096612 6379/tcp, 0.0.0.0:201->22/tcp, 0.0.0.0:881->80/tcp, 0.0.0.0:3361->3306/tcp, 0.0.0.0:9004->9001/tcp nginx1
805ef8d42fa6 6379/tcp, 0.0.0.0:202->22/tcp, 0.0.0.0:882->80/tcp, 0.0.0.0:3362->3306/tcp, 0.0.0.0:9005->9001/tcp nginx2
e91b4a662023 6379/tcp, 0.0.0.0:203->22/tcp, 0.0.0.0:883->80/tcp, 0.0.0.0:3363->3306/tcp, 0.0.0.0:9006->9001/tcp server1
01bb4850cc8c 6379/tcp, 0.0.0.0:204->22/tcp, 0.0.0.0:884->80/tcp, 0.0.0.0:3364->3306/tcp, 0.0.0.0:9007->9001/tcp server2
e500cbd1efad 6379/tcp, 0.0.0.0:205->22/tcp, 0.0.0.0:885->80/tcp, 0.0.0.0:3365->3306/tcp, 0.0.0.0:9008->9001/tcp server3
|
主要需要暴露http服务端口
负载均衡
概念
负载均衡,英文名称为Load Balance,其意思就是分摊到多个操作单元上进行执行,例如Web服务器、FTP服务器、企业关键应用服务器和其它关键任务服务器等,从而共同完成工作任务。
我们知道单台服务器的性能是有上限的,当流量很大时,就需要使用多台服务器来共同提供服务,这就是所谓的集群。
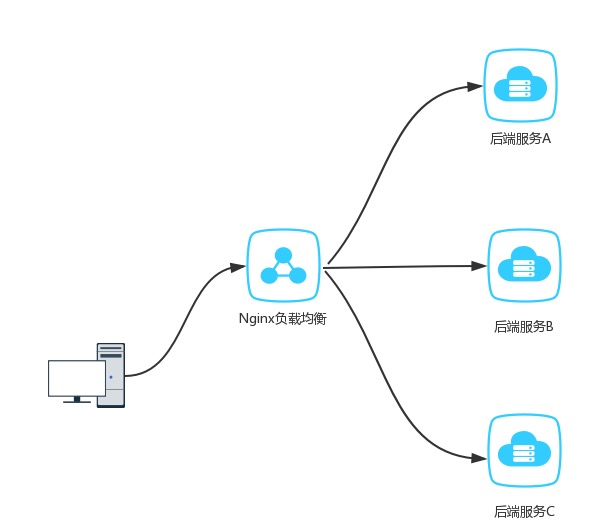
负载均衡服务器,就是用来把经过它的流量,按照某种方法,分配到集群中的各台服务器上。这样一来不仅可以承担更大的流量、降低服务的延迟,还可以避免单点故障造成服务不可用。一般的反向代理服务器,都具备负载均衡的功能。
负载均衡功能可以由硬件来提供,比如以前的F5设备。也可以由软件来提供,LVS可以提供四层的负载均衡(利用IP和端口),
架构图
负载均衡策略
加权轮询
指定轮询几率,weight和访问比率成正比,用于后端服务器性能不均的情况。
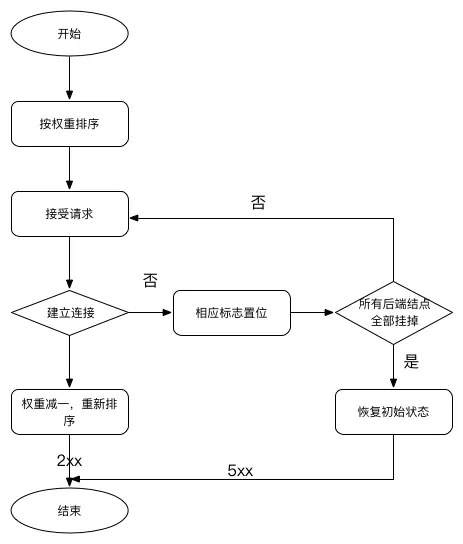
图中有两点需要注意,第一,如果可以把加权轮询算法分为先深搜索和先广搜索,那么nginx采用的是先深搜索算法,即将首先将请求都分给高权重的机器,直到该机器的权值降到了比其他机器低,才开始将请求分给下一个高权重的机器;第二,当所有后端机器都down掉时,nginx会立即将所有机器的标志位清成初始状态,以避免造成所有的机器都处在timeout的状态,从而导致整个前端被夯住。
1
2
3
4
5
6
7
8
9
10
11
12
13
14
15
16
17
| http {
upstream zhimma {
server 192.168.2.107:883 weight=5;
server 192.168.2.107:884 weight=6;
server 192.168.2.107:885 weight=7;
}
server{
listen 80;
server_name zhimma.ma;
location / {
proxy_pass http://zhimma;
proxy_set_header Host $host;
proxy_set_header X-Real-IP $remote_addr;
proxy_set_header X-Forwarded-For $proxy_add_x_forwarded_for;
}
}
}
|
除了 weight 之外,还有别的配置项
1
2
3
4
| upstream phpServers {
server 192.168.2.107:883 weight=5 max_fails=1 fail_timeout=20 max_conns=100;
server 192.168.2.107:883 weight=6 backup down
}
|
max_fails
默认为1。某台Server允许请求失败的次数,超过最大次数后,在failtimeout时间内,新的请求将不会分配给这台机器。如果设置为0,Nginx会将这台Server置为永久无效状态,然后将请求发给定义了proxynextupstream, fastcginextupstream, uwsginextupstream, scginextupstream, and memcachednext_upstream指令来处理这次错误的请求。
fail_timeout
默认为10秒。某台Server达到maxfails次失败请求后,在failtimeout期间内,nginx会认为这台Server暂时不可用,不会将请求分配给它
backup
备份机,所有服务器挂了之后才会生效
down
标识某一台server不可用
max_conns
限制分配给某台Server处理的最大连接数量,超过这个数量,将不会分配新的连接给它。默认为0,表示不限制。注意:1.5.9之后的版本才有这个配置 表示最多给100这台Server分配1000个请求,如果这台Server正在处理1000个请求,nginx将不会分配新的请求给到它。假如有一个请求处理完了,还剩下999个请求在处理,这时nginx也会将新的请求分配给它。
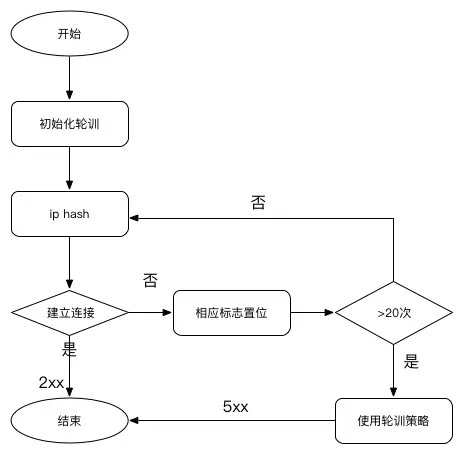
3.IP HASH
ip_hash(ip绑定)
每个请求按访问ip的hash结果分配,这样每个访客固定访问一个后端服务器,可以解决session的问题。
ip hash算法的核心实现如下:
1
2
3
4
5
| for(i = 0;i < 3;i++){
hash = (hash * 113 + iphp->addr[i]) % 6271;
}
p = hash % iphp->rrp.peers->number;
|
从代码中可以看出,hash值既与ip有关又与后端机器的数量有关。经过测试,上述算法可以连续产生1045个互异的value,这是该算法的硬限制。对此nginx使用了保护机制,当经过20次hash仍然找不到可用的机器时,算法退化成轮询。因此,从本质上说,ip hash算法是一种变相的轮询算法,如果两个ip的初始hash值恰好相同,那么来自这两个ip的请求将永远落在同一台服务器上,这为均衡性埋下了很深的隐患。
1
2
3
4
5
6
7
8
9
10
11
12
13
14
15
16
17
18
19
| http {
upstream zhimma {
ip_hash;
server 192.168.2.107:883;
server 192.168.2.107:884;
server 192.168.2.107:885;
}
server{
listen 80;
server_name zhimma.ma;
location / {
proxy_pass http://zhimma;
proxy_set_header Host $host;
proxy_set_header X-Real-IP $remote_addr;
proxy_set_header X-Forwarded-For $proxy_add_x_forwarded_for;
}
}
}
|
fair
通用hash、一致性hash
session_sticky
配置详情
负载均衡服务器
1
2
3
4
5
6
7
8
9
10
11
12
13
14
15
16
17
18
19
20
21
22
23
24
25
26
27
28
29
30
31
32
33
34
35
36
37
38
39
| user nginx;
worker_processes 1;
error_log /var/log/nginx/error.log warn;
pid /var/run/nginx.pid;
events {
worker_connections 1024;
}
http {
include /etc/nginx/mime.types;
default_type application/octet-stream;
log_format main '$remote_addr - $remote_user [$time_local] "$request" '
'$status $body_bytes_sent "$http_referer" '
'"$http_user_agent" "$http_x_forwarded_for"';
access_log /var/log/nginx/access.log main;
sendfile on;
keepalive_timeout 65;
upstream zhimma {
server 192.168.2.107:883 weight=3;
server 192.168.2.107:884 weight=4;
server 192.168.2.107:885 weight=5;
}
server{
listen 80;
server_name zhimma.ma;
root /home/www/tourism/laravel_store/public;
index index.html index.htm;
location / {
proxy_pass http://zhimma;
proxy_set_header Host $host;
proxy_set_header X-Real-IP $remote_addr;
proxy_set_header X-Forwarded-For $proxy_add_x_forwarded_for;
}
}
}
|
业务服务器
1
2
3
4
5
6
7
8
9
10
11
12
13
14
15
16
17
18
19
20
21
22
23
24
25
26
27
28
29
30
31
32
33
34
35
36
37
38
| [root@e91b4a662023 conf.d]# pwd
/etc/nginx/conf.d
[root@e91b4a662023 conf.d]# ls
zhimma.ma.conf
root@e91b4a662023 conf.d]# cat zhimma.ma.conf
server {
listen 80;
server_name zhimma.ma;
root /home/www/zhimma/server1;
index index.php index.html index.htm;
error_page 500 502 503 504 /50x.html;
location = /50x.html {
root html;
}
location / {
location ~ \.php$ {
fastcgi_pass 127.0.0.1:9000;
fastcgi_index index.php;
fastcgi_param SCRIPT_FILENAME $document_root$fastcgi_script_name;
include fastcgi_params;
}
try_files $uri $uri/ /index.php$is_args$args;
}
}
|
重启nginx ,配置hosts,访问zhimma.ma:881,就能看的切换的效果了