[TOC]
性能概念TPS、QPS、RPS
TPS
TPS:Transactions Per Second(每秒事务处理数),指服务器每秒处理的事务次数。一般用于评估数据库、交易系统的基准性能。
QPS
QPS:Queries Per Second(查询量/秒),是服务器每秒能够处理的查询次数,例如域名服务器、Mysql查询性能。
RPS
RPS:Request Per Second(请求数/秒)RPS(Request Per Second)和QPS可以认为是一回事。RT:Response Time(响应时间):客户端发一个请求开始计时,到客户端接收到从服务器端返回的响应结果结束所经历的时间,响应时间由请求发送时间、网络传输时间和服务器处理时间三部分组成。也叫Think Time。
并发数与TPS/QPS的关系
QPS(TPS)= 并发数/平均响应时间这里的并发数如果为事务处理请求数,则为TPS,如果为查询请求数,则为QPS。
服务器状态
https://blog.csdn.net/u011636440/article/details/78611838
操作系统
查看当前操作系统发行版信息
1 | [root@VM_25_122_centos conf.d]# cat /etc/redhat-release |
CPU
1 | [root@VM_25_122_centos conf.d]# lscpu |
查看物理CPU个数
1 | [root@VM_25_122_centos conf.d]# cat /proc/cpuinfo| grep "physical id"| sort| uniq| wc -l |
查看每个物理CPU中core的个数(即核数)
1 | [root@VM_25_122_centos conf.d]# cat /proc/cpuinfo| grep "cpu cores"| uniq |
查看逻辑CPU的个数
1 | [root@VM_25_122_centos conf.d]# cat /proc/cpuinfo| grep "processor"| wc -l |
内存
查看概要内存使用情况
1 | [root@VM_25_122_centos conf.d]# free -g |
-g是以GB为单位;也可以使用-m,即以MB为单位
压测和优化
未优化压测
压测结果预览
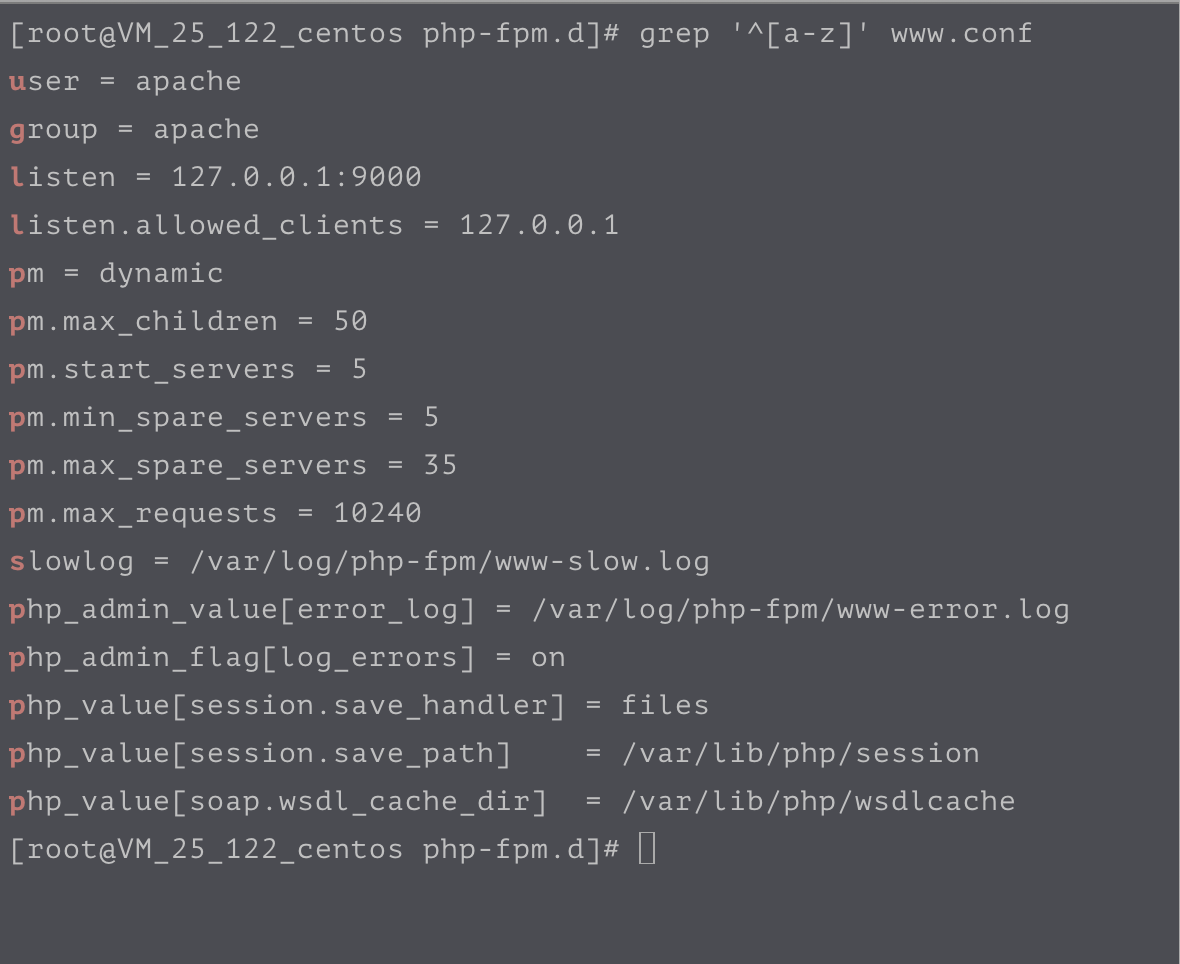
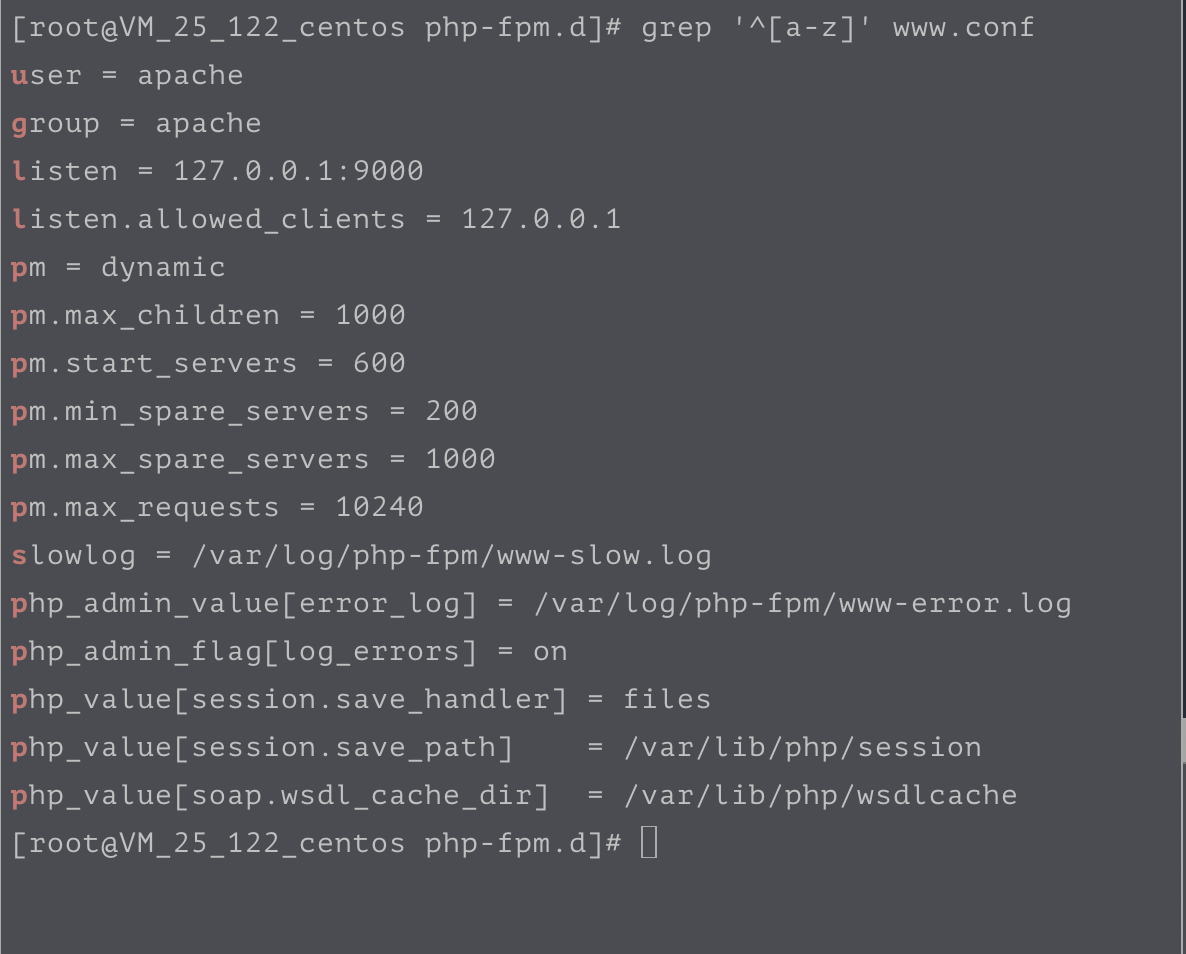
PHP-FPM配置
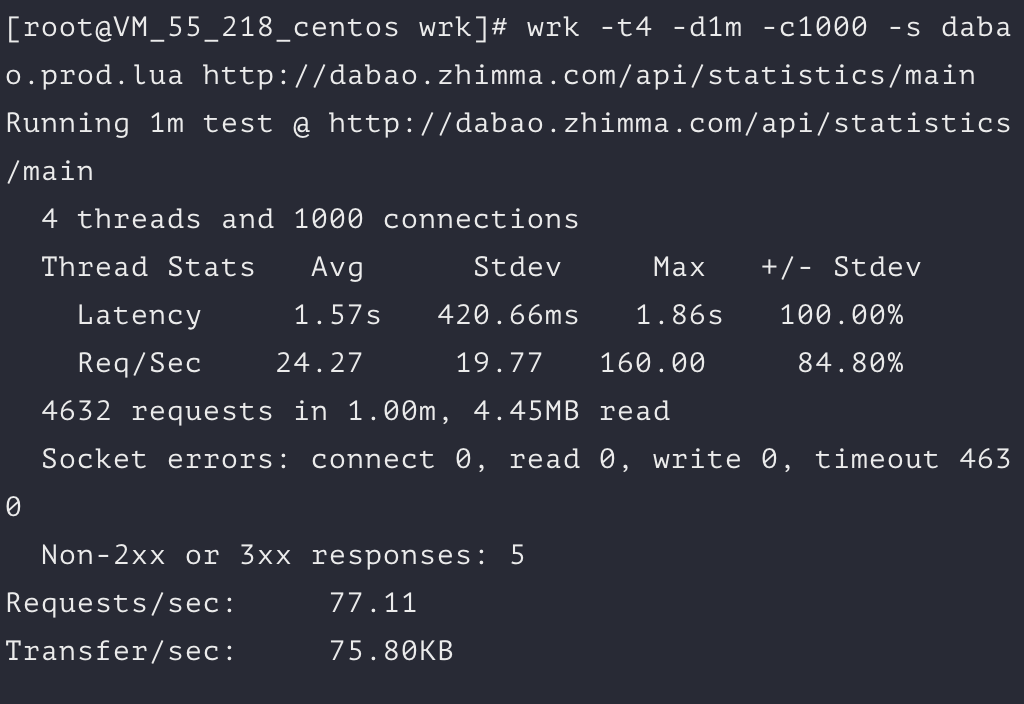
wrk压测结果

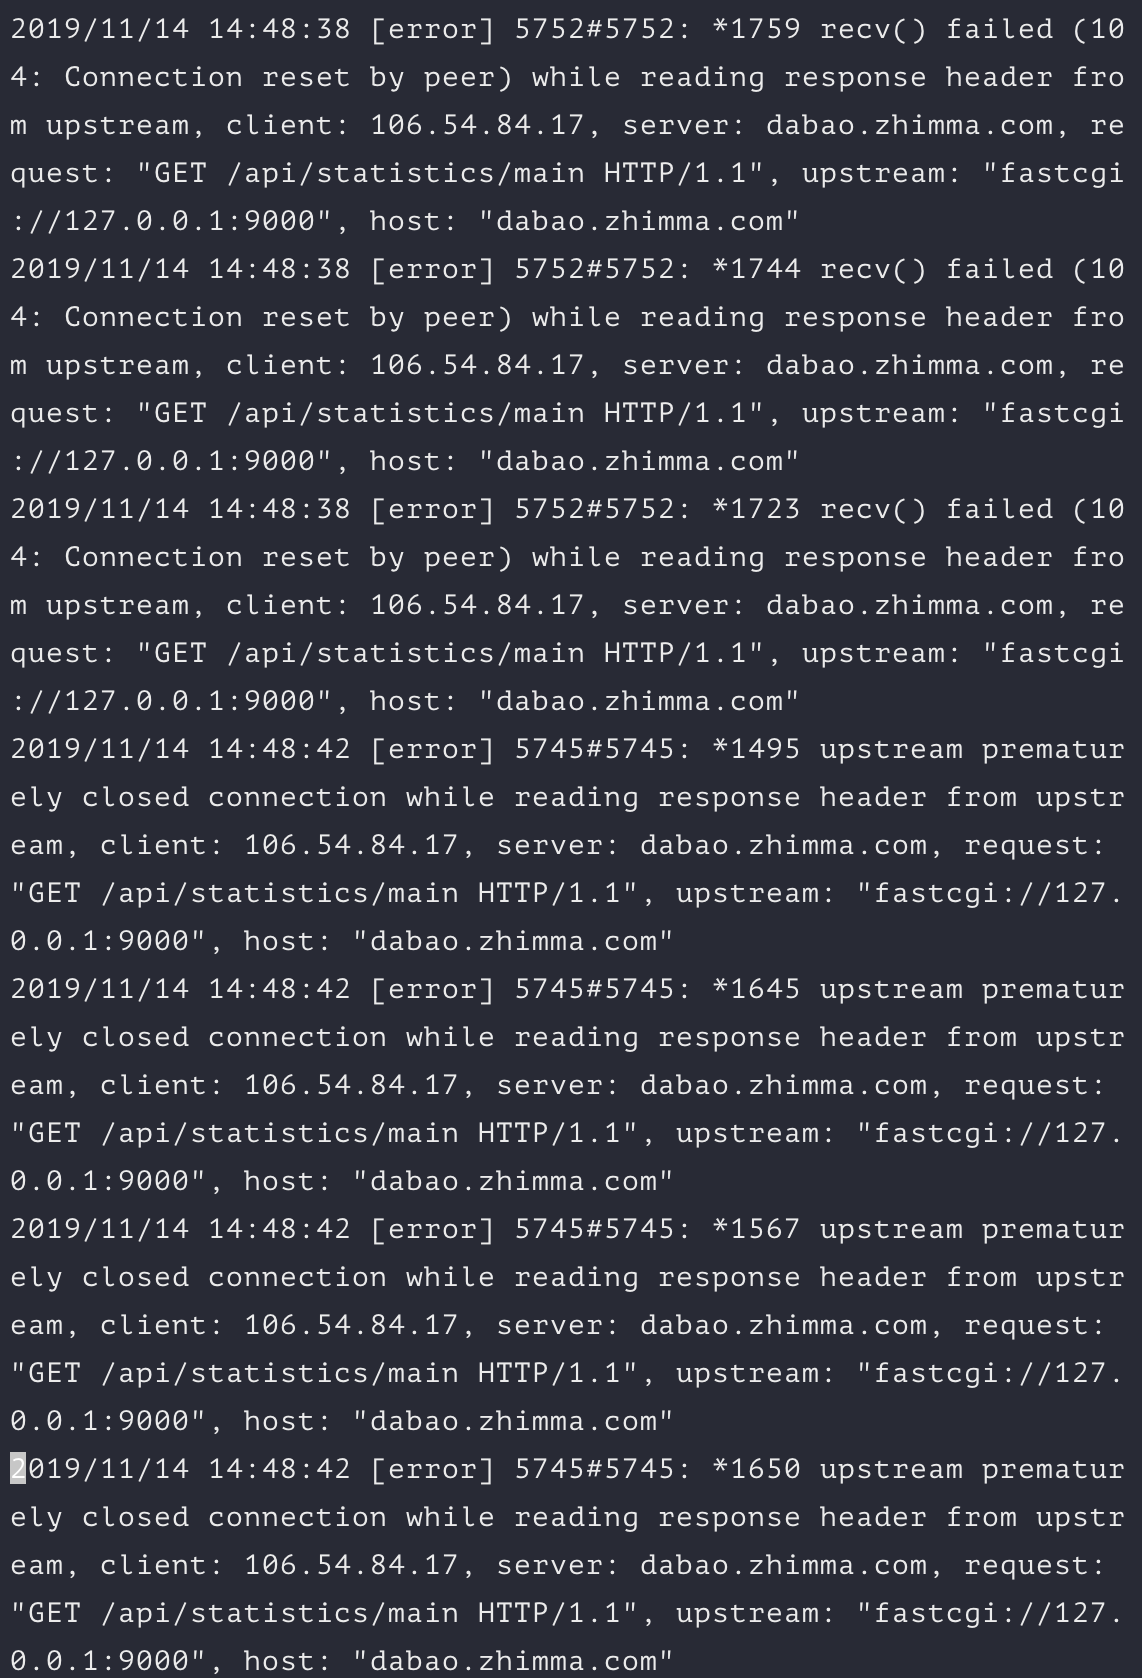
Nginx报错
优化PHP-FPM
PHP-FPM优化(示例:这是另一台服务器)
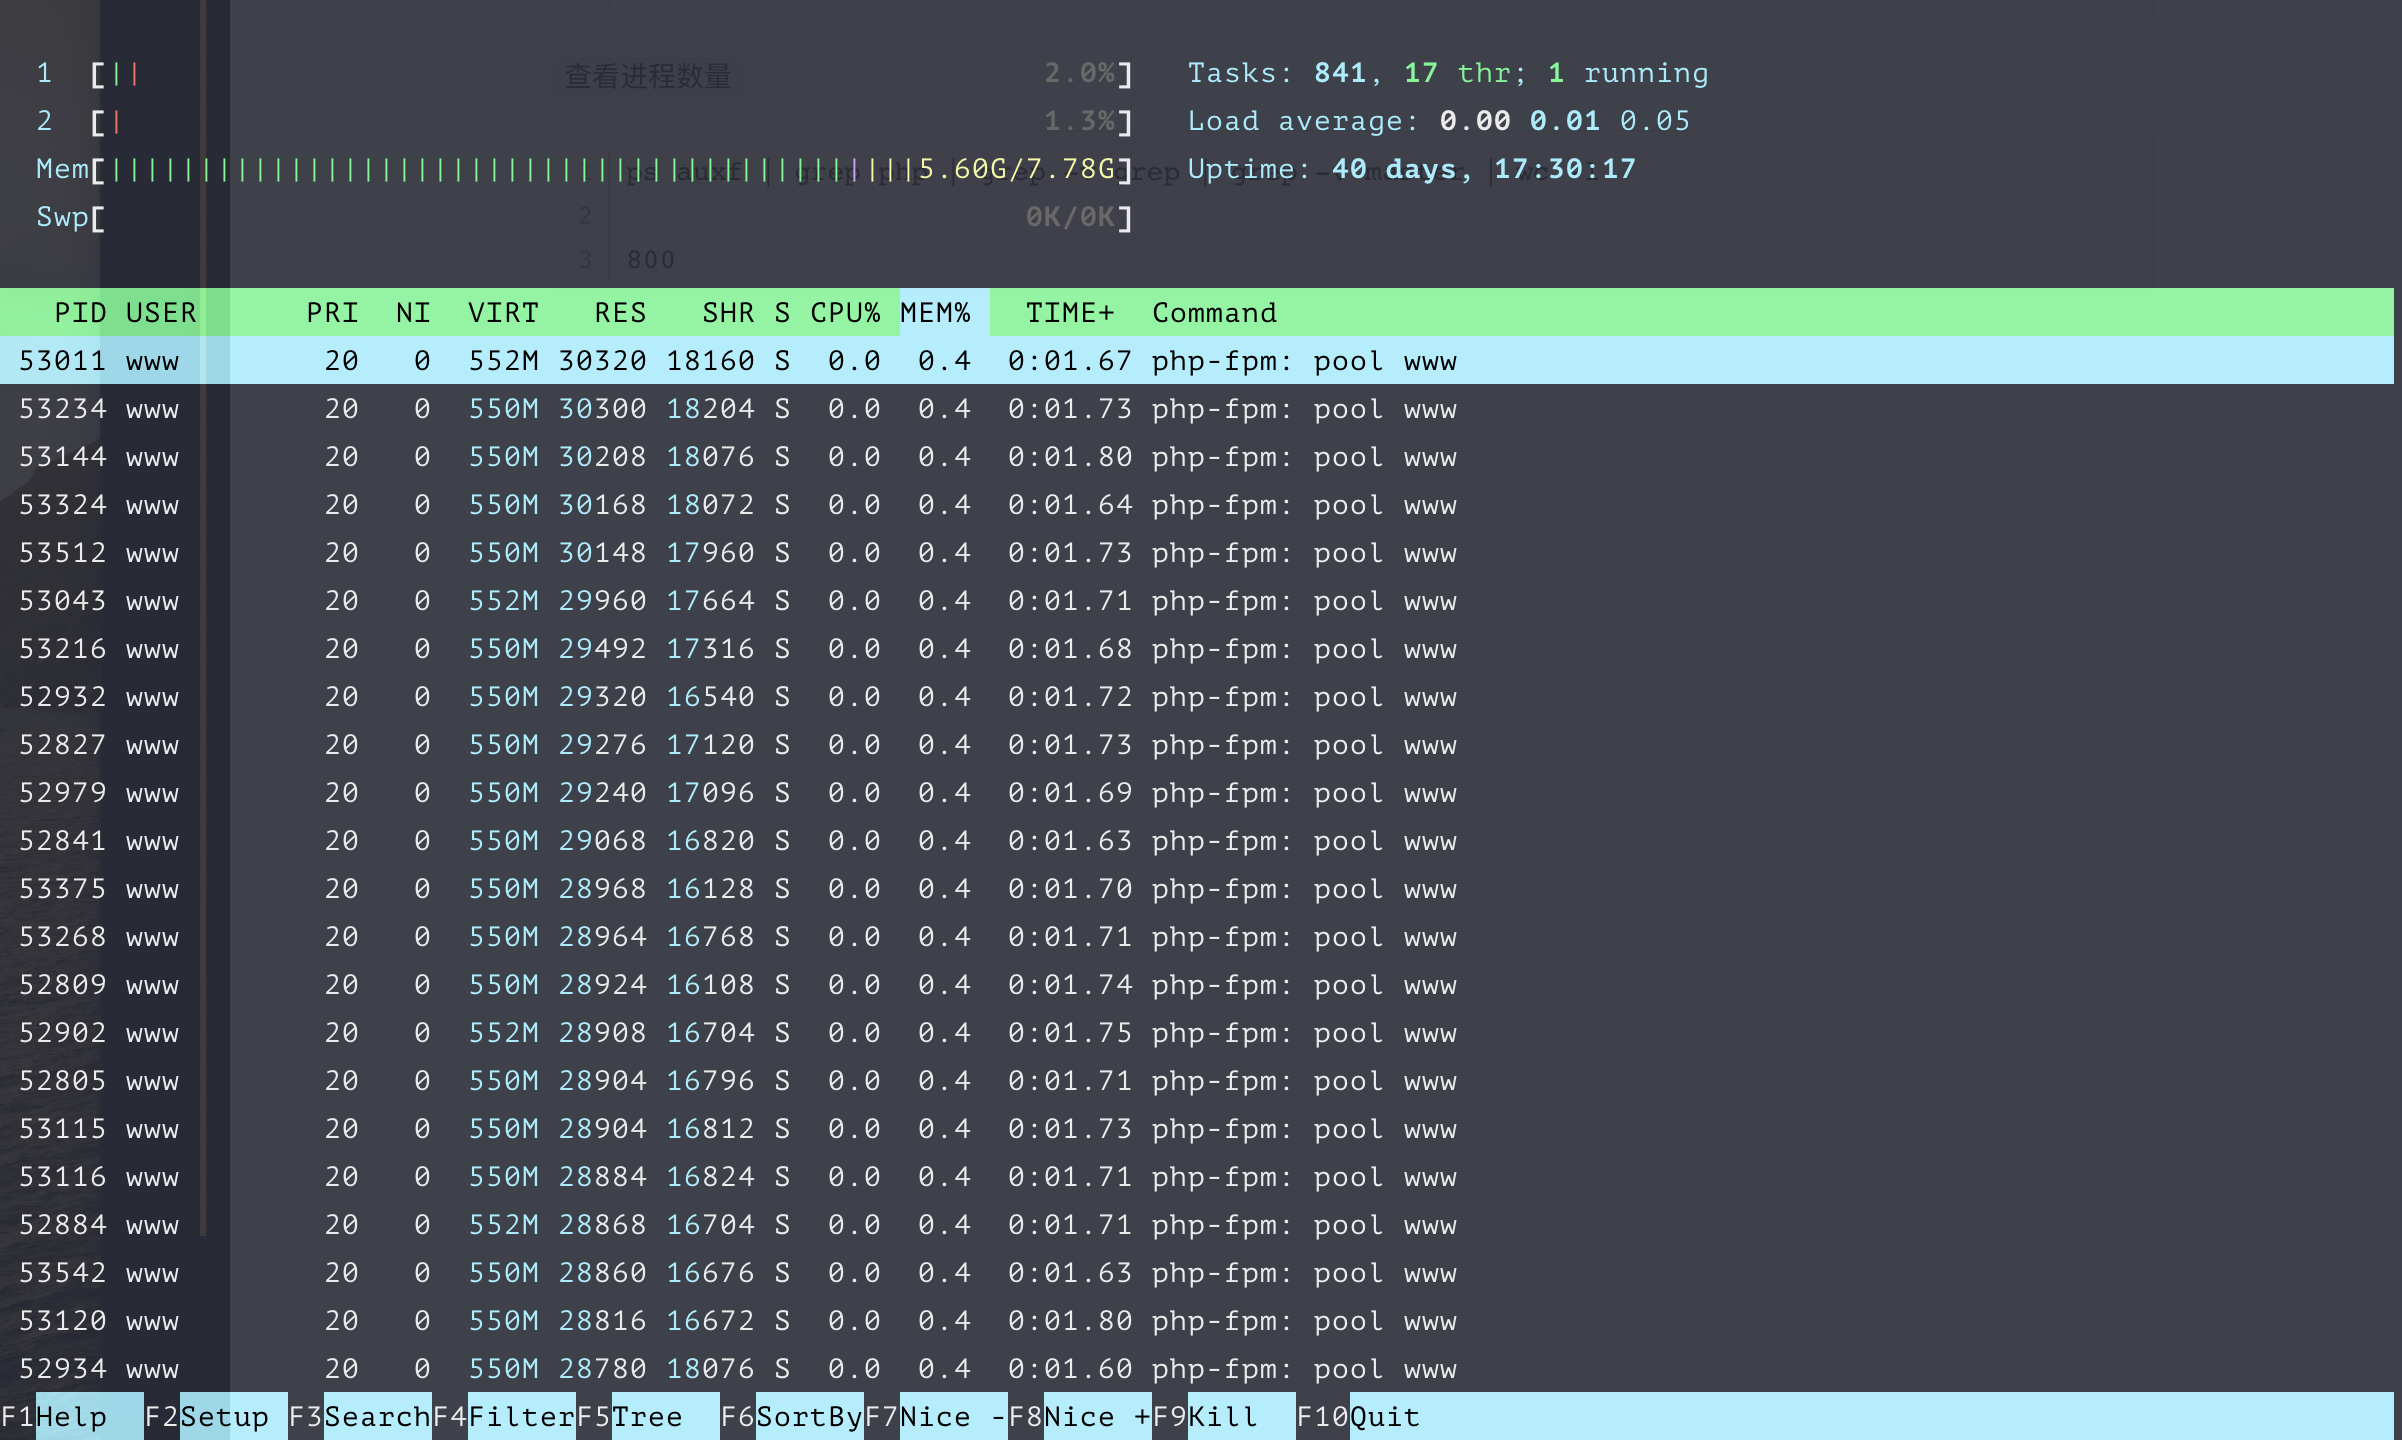
USER PID %CPU %MEM VSZ RSS TTY STAT START TIME COMMAND
格式说明:
USER: 行程拥有者
PID: pid
%CPU: 占用的 CPU 使用率
%MEM: 占用的记忆体使用率
VSZ: 占用的虚拟记忆体大小
RSS: 占用的记忆体大小
TTY: 终端的次要装置号码 (minor device number of tty)
STAT: 该行程的状态,linux的进程有5种状态:
D 不可中断 uninterruptible sleep (usually IO)
R 运行 runnable (on run queue)
S 中断 sleeping
T 停止 traced or stopped
Z 僵死 a defunct (”zombie”) process
注: 其它状态还包括W(无驻留页), <(高优先级进程), N(低优先级进程), L(内存锁页).
START: 行程开始时间
TIME: 执行的时间
COMMAND:所执行的指令
查看进程的消息
ps auxf | grep php | grep -v grep
grep -v grep 过滤当前命令grep
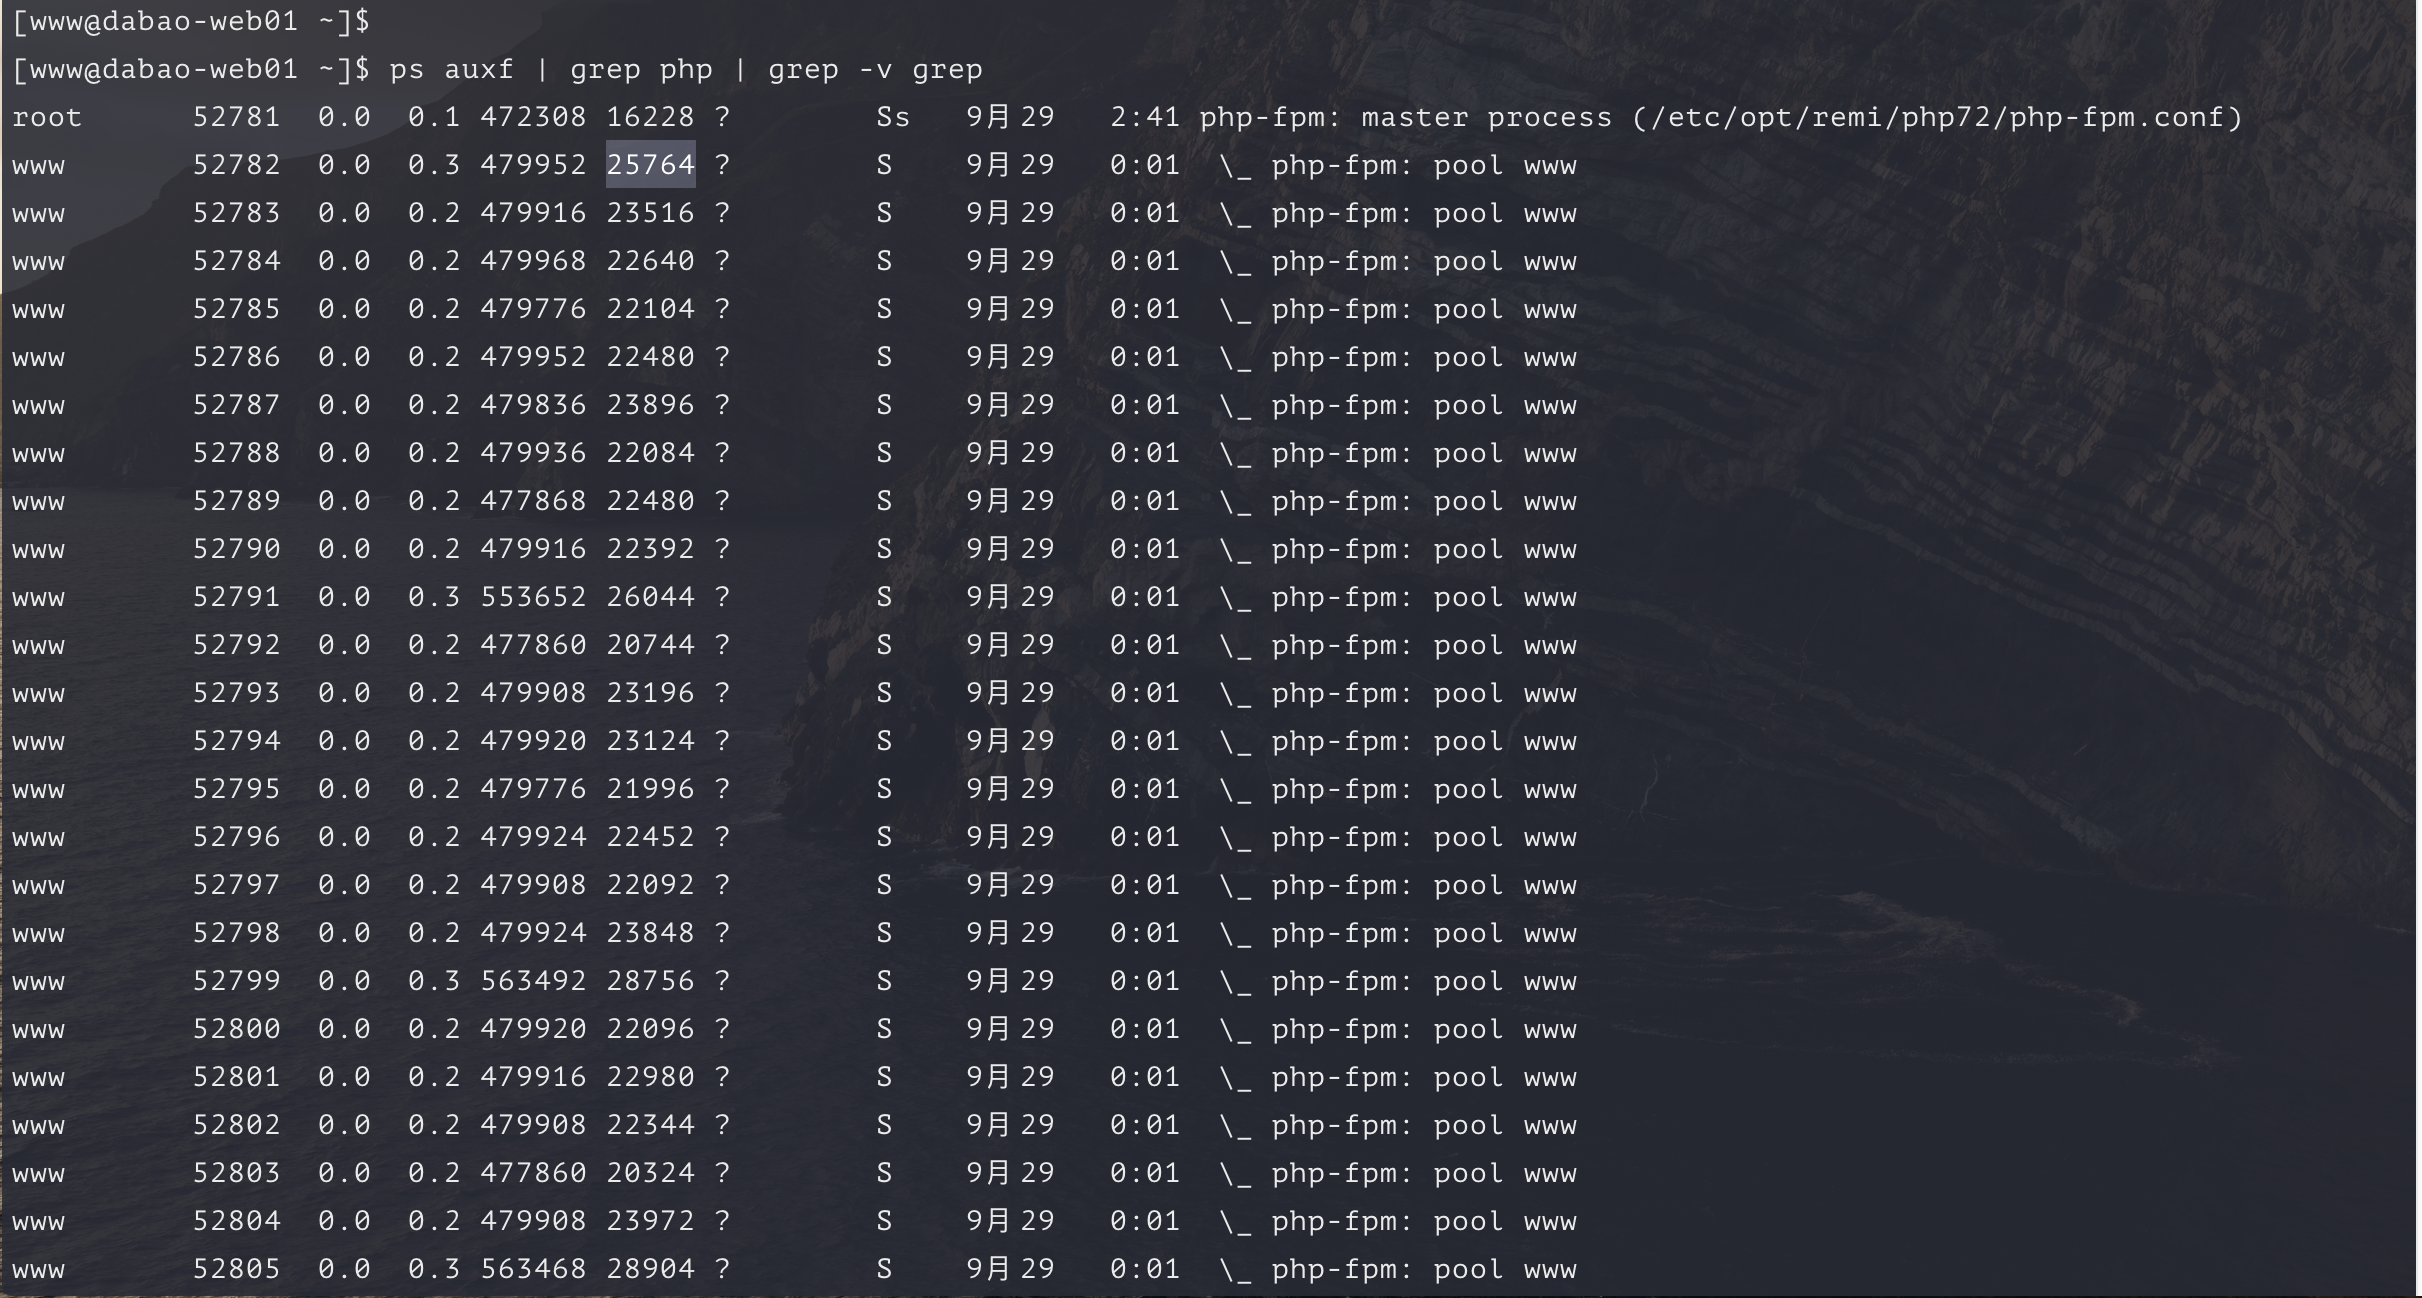
占用的内存数量
1 | ps auxf | grep php | grep -v grep | grep -v master | awk '{sum+=$6} END {print sum}' |
查看进程数量
1 | ps auxf | grep php | grep -v grep | grep -v master | wc -l |
可以看到第6列,每一个子进程的内存占用大概在22M之间(单位为KB)。平均的内存占用为18207120KB/800/1024 = 22.2M。
进程数限制
此时如果我们分配全部的内存给PHP-FPM使用,那么进程数可以限制在`16*1000/22 = 744,但是由于我们的服务器同时服务了很多内容,所以我们可以向下调整到256个进程数:
1 | process.max = 700 |
max_children
- 这个值原则上是越大越好,php-cgi的进程多了就会处理的很快,排队的请求就会很少。
- 设置”max_children”也需要根据服务器的性能进行设定
- 一般来说一台服务器正常情况下每一个php-cgi所耗费的内存在20M左右
- 假设“max_children”设置成100个,20M*100=2000M
- 也就是说在峰值的时候所有PHP-CGI所耗内存在2000M以内。
- 假设“max_children”设置的较小,比如5-10个,那么php-cgi就会“很累”,处理速度也很慢,等待的时间也较长。
- 如果长时间没有得到处理的请求就会出现504 Gateway Time-out这个错误,而正在处理的很累的那几个php-cgi如果遇到了问题就会出现502 Bad gateway这个错误。
start_servers
- pm.start_servers的默认值为2。并且php-fpm中给的计算方式也为:
{(cpu空闲时等待连接的php的最小子进程数) + (cpu空闲时等待连接的php的最大子进程数 - cpu空闲时等待连接的php的最小子进程数)/ 2}; - 用配置表示就是:min_spare_servers + (max_spare_servers - min_spare_servers) / 2;
- 一般而言,设置成10-20之间的数据足够满足需求了。
max_requests(最大请求数)
最大处理请求数是指一个php-fpm的worker进程在处理多少个请求后就终止掉,master进程会重新respawn一个新的。
这个配置的主要目的是避免php解释器或程序引用的第三方库造成的内存泄露。
pm.max_requests = 10240
- 当一个 PHP-CGI 进程处理的请求数累积到 max_requests 个后,自动重启该进程。
- 502,是后端 PHP-FPM 不可用造成的,间歇性的502一般认为是由于 PHP-FPM 进程重启造成的.
- 但是为什么要重启进程呢?
- 如果不定期重启 PHP-CGI 进程,势必造成内存使用量不断增长(比如第三方库有问题等)。因此 PHP-FPM 作为 PHP-CGI 的管理器,提供了这么一项监控功能,对请求达到指定次数的 PHP-CGI 进程进行重启,保证内存使用量不增长。
- 正是因为这个机制,在高并发中,经常导致 502 错误
- 目前我们解决方案是把这个值尽量设置大些,减少 PHP-CGI 重新 SPAWN 的次数,同时也能提高总体性能。PS:刚开始我们是500导致内存飙高,现在改成5120,当然可以再大一些,10240等,这个主要看测试结果,如果没有内存泄漏等问题,可以再大一些。
request_terminate_timeout(最长执行时间)
max_execution_time和request_terminate_timeout
; The timeout for serving a single request after which the worker process will
; be killed. This option should be used when the ‘max_execution_time’ ini option
; does not stop script execution for some reason. A value of ‘0’ means ‘off’.
; Available units: s(econds)(default), m(inutes), h(ours), or d(ays)
; Default Value: 0
;request_terminate_timeout = 0
============
设置单个请求的超时中止时间. 该选项可能会对php.ini设置中的’max_execution_time’因为某些特殊原因没有中止运行的脚本有用. 设置为 ‘0’ 表示 ‘Off’.当经常出现502错误时可以尝试更改此选项。
- 这两项都是用来配置一个PHP脚本的最大执行时间的。当超过这个时间时,PHP-FPM不只会终止脚本的执行,还会终止执行脚本的Worker进程。
- Nginx会发现与自己通信的连接断掉了,就会返回给客户端502错误。
优化PHP-FPM压测
优化PHP-FPM结果预览
PHP-FPM配置
wrk压测结果
Nginx报错
优化Nginx压测
https://www.cyberciti.biz/faq/linux-unix-nginx-too-many-open-files/
http://www.chengweiyang.cn/2015/11/14/how-to-enlarge-linux-open-files-upper-cell/
错误:24: Too many open files
错误详情
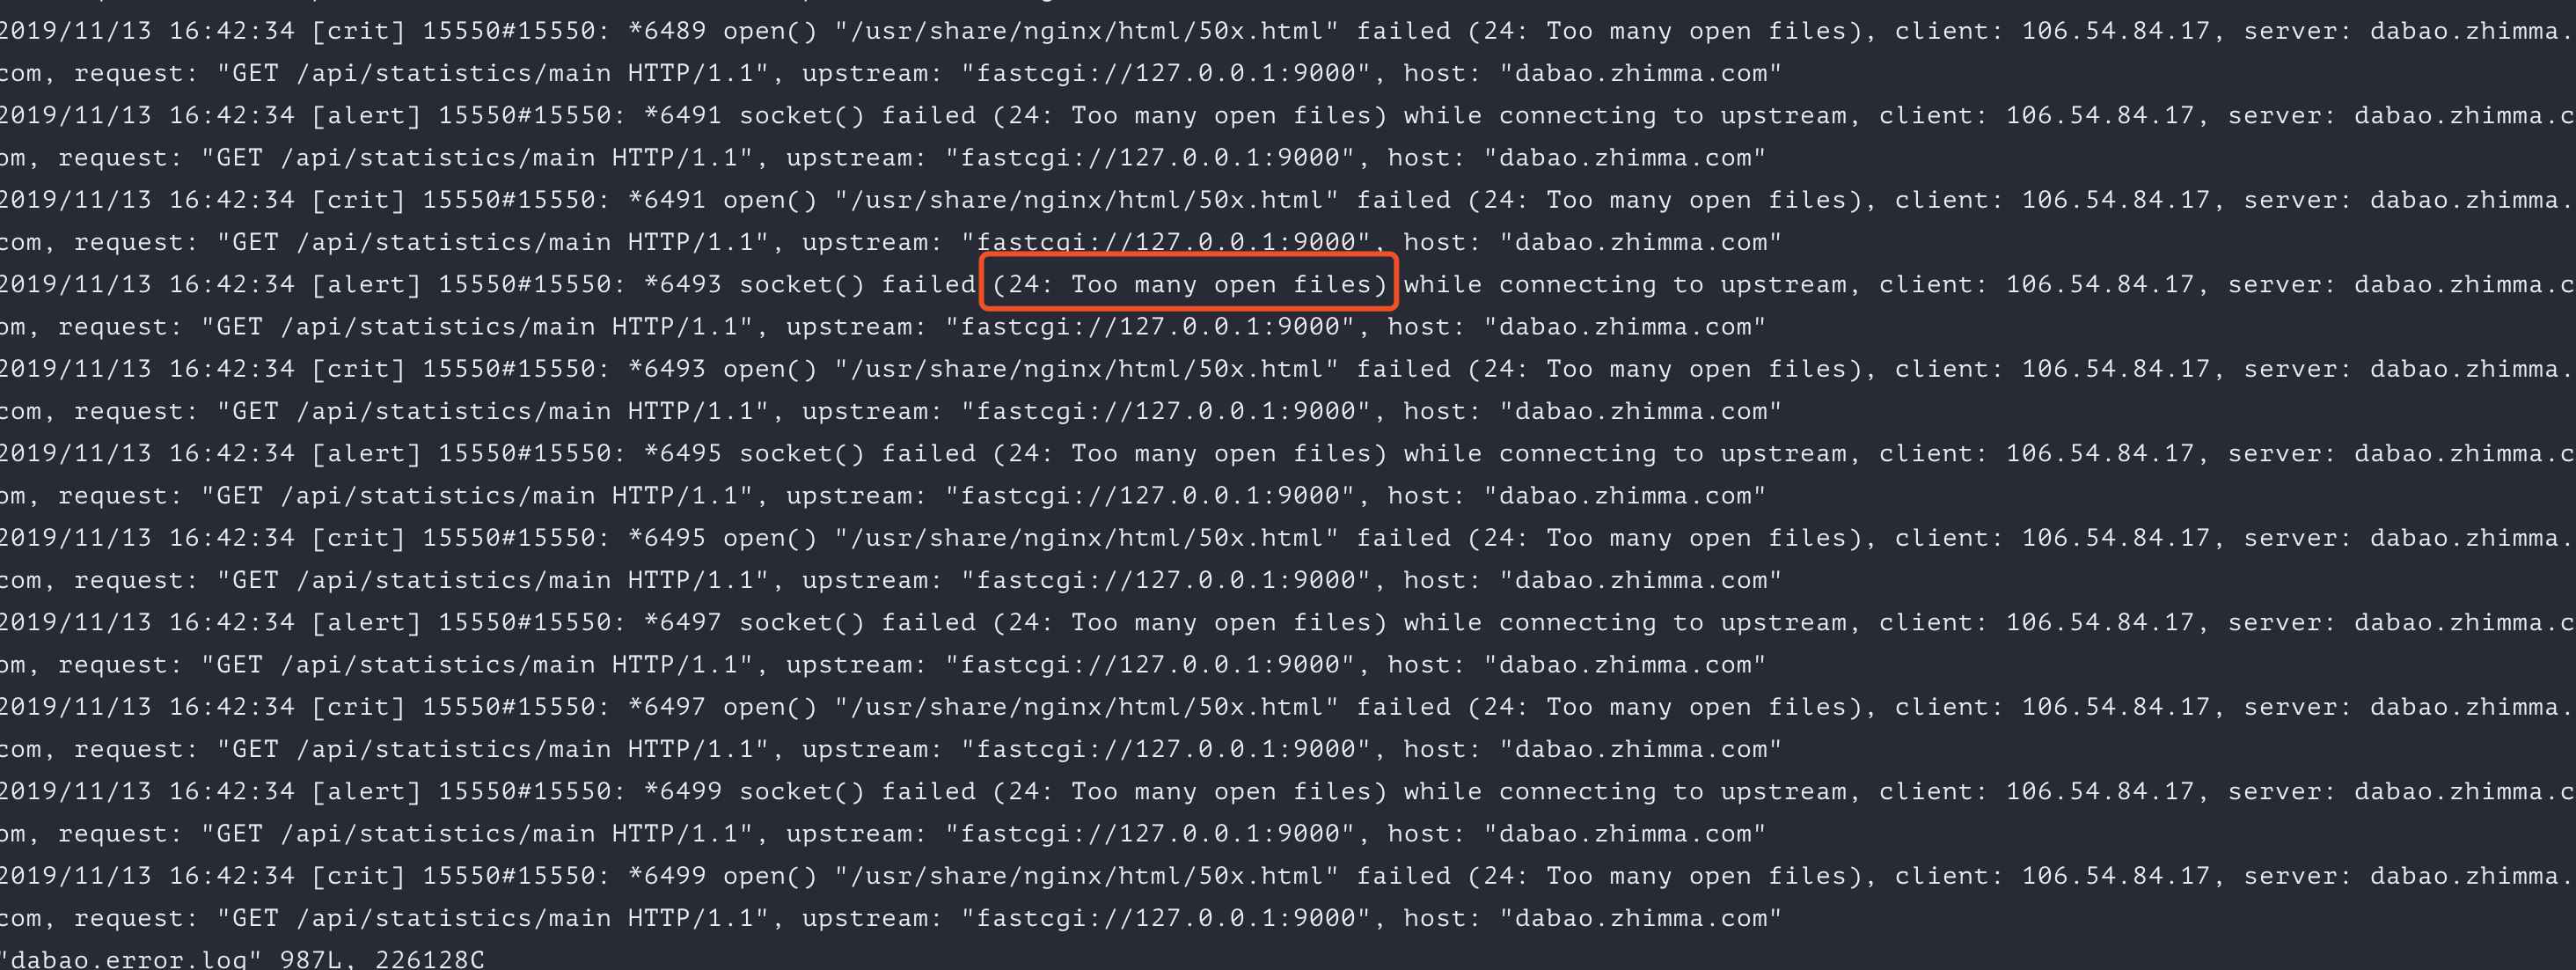
错误原因
Linux / UNIX对文件句柄和打开文件的数量设置了软限制和硬限制。您可以使用ulimit命令查看这些限制
查看硬值和软值:
1 | ulimit -Hn |
解决方法
在Linux OS级别上增加开放FD限制
编辑文件/etc/sysctl.conf,输入:
1 | vi /etc/sysctl.conf |
追加/修改以下行:fs.file-max = 100000
保存并关闭文件。编辑/etc/security/limits.conf,输入:# vi /etc/security/limits.conf
Set soft and hard limit for all users or nginx user as follows:
1 | nginx soft nofile 100000 |
保存并并关闭文件输入下面命令使之生效sysctl -p
Nginx优化
https://www.mtyun.com/library/how-to-optimize-nginx
https://www.linpx.com/p/11-nginx-parameter-performance-optimization-suggestions.html
对于Nginx的调优,可以大致从如下指令着手
- worker_processes
- worker_connections
- Buffers
- Timeouts
- Gzip Compression
- Static File Caching
- logging
1 | user nginx; |
#####worker_processes-配置工作进程数量
worker_processes表示工作进程的数量,一般情况设置成CPU核的数量即可,一个cpu配置多于一个worker数,对Nginx而言没有任何益处
1 | grep processor /proc/cpuinfo | wc -l |
这个命令会告诉你当前机器是多少核,输出为8即表示8核。
worker_cpu_affinity-配置cpu亲和性
设置worker_cpu_affinity,这个配置用于将worker process与指定cpu核绑定,降低由于多CPU核切换造成的寄存器等现场重建带来的性能损耗。
worker_rlimit_nofile-配置 worker 进程的最大打开文件数
调整配置 Nginx worker 进程的最大打开文件数,这个控制连接数的参数为 worker_rlimit_nofile。该参数的实际配置如下:
1 | worker_rlimit_nofile 65535; |
可设置为系统优化后的 ulimit -HSn 的结果
events块-配置事件处理模型的优化
1 | events { |
use epoll
Nginx 的连接处理机制在不同的操作系统中会采用不同的 I/O 模型,在 linux 下,Nginx 使用 epoll 的 I/O 多路复用模型,在 Freebsd 中使用 kqueue 的 I/O 多路复用模型,在 Solaris 中使用 /dev/poll 方式的 I/O 多路复用模型,在 Windows 中使用 icop,等等。
events 指令是设定 Nginx 的工作模式及连接数上限。use指令用来指定 Nginx 的工作模式。Nginx 支持的工作模式有 select、 poll、 kqueue、 epoll 、 rtsig 和/ dev/poll。当然,也可以不指定事件处理模型,Nginx 会自动选择最佳的事件处理模型。
accept_mutex off/on ?
https://blog.huoding.com/2013/08/24/281
https://www.linuxdashen.com/nginx%E6%9C%8D%E5%8A%A1%E5%99%A8%E6%80%A7%E8%83%BD%E4%BC%98%E5%8C%96
关闭 accept_mutex ,请求在多个 worker 间的分配更均衡
accept_mutex_delay
当accept_mutex功能启用后,只有一个持有mutex锁的worker进程会接受并处理请求,其他worker进程等待。accept_mutex_delay指定的时间就是这些worker进程的等待时间,过了等待时间下一个worker进程便取得mutex锁,处理请求。accept_mutex_delay在events模块中指定,默认的值为500ms。
worker_connections
通过调整控制连接数的参数来调整 Nginx 单个进程允许的客户端最大连接数。
worker_connections 也是个事件模块指令,用于定义 Nginx 每个进程的最大连接数,默认是 1024。
最大连接数的计算公式如下:
1 | max_clients = worker_processes * worker_connections; |
如果作为反向代理,因为浏览器默认会开启 2 个连接到 server,而且 Nginx 还会使用fds(file descriptor)从同一个连接池建立连接到 upstream 后端。则最大连接数的计算公式如下:
1 | max_clients = worker_processes * worker_connections / 4; |
另外,进程的最大连接数受 Linux 系统进程的最大打开文件数限制,在执行操作系统命令 ulimit -HSn 65535或配置相应文件后, worker_connections 的设置才能生效。
multi_accept
默认情况下,Nginx 进程只会在一个时刻接收一个新的连接,我们可以配置multi_accept 为 on,实现在一个时刻内可以接收多个新的连接,提高处理效率。该参数默认是 off,建议开启。
tcp优化
1 | http { |
sendfile
第一行的 sendfile 配置可以提高 Nginx 静态资源托管效率。sendfile 是一个系统调用,直接在内核空间完成文件发送,不需要先 read 再 write,没有上下文切换开销。
tcp_nopush
TCP_NOPUSH 是 FreeBSD 的一个 socket 选项,对应 Linux 的 TCP_CORK,Nginx 里统一用 tcp_nopush 来控制它,并且只有在启用了 sendfile 之后才生效。启用它之后,数据包会累计到一定大小之后才会发送,减小了额外开销,提高网络效率。
keepalive_timeout
Nginx 使用 keepalive_timeout 来指定 KeepAlive 的超时时间(timeout)。指定每个 TCP 连接最多可以保持多长时间。Nginx 的默认值是 75 秒,有些浏览器最多只保持 60 秒,所以可以设定为 60 秒。若将它设置为 0,就禁止了 keepalive 连接。
keepalive_requests
keepalive_requests指令用于设置一个keep-alive连接上可以服务的请求的最大数量,当最大请求数量达到时,连接被关闭。默认是100。
这个参数的真实含义,是指一个keep alive建立之后,nginx就会为这个连接设置一个计数器,记录这个keep alive的长连接上已经接收并处理的客户端请求的数量。如果达到这个参数设置的最大值时,则nginx会强行关闭这个长连接,逼迫客户端不得不重新建立新的长连接。
大多数情况下当QPS(每秒请求数)不是很高时,默认值100凑合够用。但是,对于一些QPS比较高(比如超过10000QPS,甚至达到30000,50000甚至更高) 的场景,默认的100就显得太低。
简单计算一下,QPS=10000时,客户端每秒发送10000个请求(通常建立有多个长连接),每个连接只能最多跑100次请求,意味着平均每秒钟就会有100个长连接因此被nginx关闭。同样意味着为了保持QPS,客户端不得不每秒中重新新建100个连接。因此,就会发现有大量的TIME_WAIT的socket连接(即使此时keep alive已经在client和nginx之间生效)。因此对于QPS较高的场景,非常有必要加大这个参数,以避免出现大量连接被生成再抛弃的情况,减少TIME_WAIT。
tcp_nodelay
TCP_NODELAY 也是一个 socket 选项,启用后会禁用 Nagle 算法,尽快发送数据,某些情况下可以节约 200ms(Nagle 算法原理是:在发出去的数据还未被确认之前,新生成的小数据先存起来,凑满一个 MSS 或者等到收到确认后再发送)。Nginx 只会针对处于 keep-alive 状态的 TCP 连接才会启用 tcp_nodelay。
优化连接参数
这部分更多是更具业务场景来决定的。例如client_max_body_size用来决定请求体的大小,用来限制上传文件的大小。上面列出的参数可以作为起始参数。
1 | http { |
Buffers:另一个很重要的参数为buffer,如果buffer太小,Nginx会不停的写一些临时文件,这样会导致磁盘不停的去读写,现在我们先了解设置buffer的一些相关参数:
client_body_buffer_size
允许客户端请求的最大单个文件字节数
client_header_buffer_size
用于设置客户端请求的Header头缓冲区大小,大部分情况1KB大小足够
client_max_body_size
设置客户端能够上传的文件大小,默认为1m
large_client_header_buffers
该指令用于设置客户端请求的Header头缓冲区大小
超时时间优化
client_body_timeout
设定客户端与服务器建立连接后发送request body的超时时间。如果客户端在此时间内没有发送任何内容,那么Nginx返回HTTP 408错误(Request Timed Out)。它的默认值是60秒,在http, server 和 location模块中定义。
client_header_timeout
设定客户端向服务器发送一个完整的request header的超时时间。如果客户端在此时间内没有发送一个完整的request header,那么Nginx返回HTTP 408错误(Request Timed Out)。它的默认值是60秒,在http 和 server模块中定义。
send_timeout
指定了向客户端传输数据的超时时间。默认值为60秒,可以在http, server 和 location模块中定义
压缩优化
Gzip 压缩
开启Gzip,gzip可以帮助Nginx减少大量的网络传输工作,另外要注意gzip_comp_level的设置,太高的话,Nginx服务会浪费CPU的执行周期。
1 | http { |
静态资源缓存
1 | location ~* .(jpg|jpeg|png|gif|ico|css|js)$ { |
压测总结
 服务器负载已达到最大,php-fpm+nginx模式进行优化不能再明显的提高PRS
Swoole
1 | gzip on; |
压测结果

php-fpm 配置文件解读
1 | pid = /usr/local/var/run/php-fpm.pid |
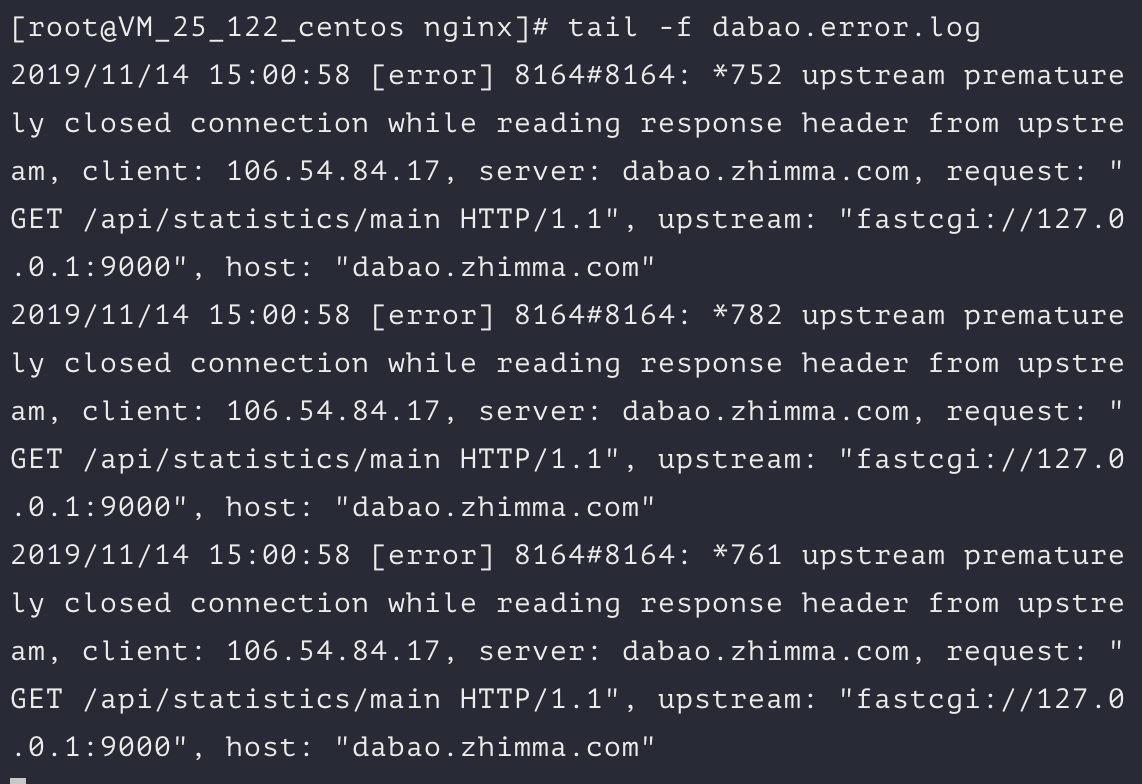
Nginx错误日志说明
| 错误信息 | 错误说明 |
|---|---|
| upstream prematurely(过早的) closed connection | 请求uri的时候出现的异常,是由于upstream还未返回应答给用户时用户断掉连接造成的,对系统没有影响,可以忽略 |
| recv() failed (104: Connection reset by peer) | (1)服务器的并发连接数超过了其承载量,服务器会将其中一些连接Down掉; (2)客户关掉了浏览器,而服务器还在给客户端发送数据; (3)浏览器端按了Stop |
| (111: Connection refused) while connecting to upstream | 用户在连接时,若遇到后端upstream挂掉或者不通,会收到该错误 |
| (111: Connection refused) while reading response header from upstream | 用户在连接成功后读取数据时,若遇到后端upstream挂掉或者不通,会收到该错误 |
| (111: Connection refused) while sending request to upstream | Nginx和upstream连接成功后发送数据时,若遇到后端upstream挂掉或者不通,会收到该错误 |
| (110: Connection timed out) while connecting to upstream | nginx连接后面的upstream时超时 |
| (110: Connection timed out) while reading upstream | nginx读取来自upstream的响应时超时 |
| (110: Connection timed out) while reading response header from upstream | nginx读取来自upstream的响应头时超时 |
| (110: Connection timed out) while reading upstream | nginx读取来自upstream的响应时超时 |
| (104: Connection reset by peer) while connecting to upstream | upstream发送了RST,将连接重置 |
| upstream sent invalid header while reading response header from upstream | upstream发送的响应头无效 |
| upstream sent no valid HTTP/1.0 header while reading response header from upstream | upstream发送的响应头无效 |
| client intended to send too large body | 用于设置允许接受的客户端请求内容的最大值,默认值是1M,client发送的body超过了设置值 |
| reopening logs | 用户发送kill -WINCH命令 |
| no servers are inside upstream | upstream下未配置server |
| no live upstreams while connecting to upstream | upstream下的server全都挂了 |
| SSL_do_handshake() failed | SSL握手失败 |
| SSL_write() failed (SSL:) while sending to client | |
| (13: Permission denied) while reading upstream | |
| (98: Address already in use) while connecting to upstream | |
| (99: Cannot assign requested address) while connecting to upstream | |
| ngx_slab_alloc() failed: no memory in SSL session shared cache | ssl_session_cache大小不够等原因造成 |
| could not add new SSL session to the session cache while SSL handshaking | ssl_session_cache大小不够等原因造成 |
| send() failed (111: Connection refused) |
错误日志类型
- 类型1: upstream timed out
- 类型2: connect() failed
- 类型3: no live upstreams
- 类型4: upstream prematurely closed connection
- 类型5: 104: Connection reset by peer
- 类型6: client intended to send too large body
- 类型7: upstream sent no valid HTTP/1.0 header
| 类型 | 错误日志 | 原因 | 解决办法 |
|---|---|---|---|
| 1 | upstream timed out (110: Connection timed out) while connecting to upstream | nginx与upstream建立tcp连接超时,nginx默认连接建立超时为200ms | 排查upstream是否能正常建立tcp连接 |
| 1 | upstream timed out (110: Connection timed out) while reading response header from upstream | nginx从upstream读取响应时超时,nginx默认的读超时为20s,读超时不是整体读的时间超时,而是指两次读操作之间的超时,整体读耗时有可能超过20s | 排查upstream响应请求为什么过于缓慢 |
| 2 | connect() failed (104: Connection reset by peer) while connecting to upstream | nginx与upstream建立tcp连接时被reset | 排查upstream是否能正常建立tcp连接 |
| 2 | connect() failed (111: Connection refused) while connecting to upstream | nginx与upstream建立tcp连接时被拒 | 排查upstream是否能正常建立tcp连接 |
| 3 | no live upstreams while connecting to upstream | nginx向upstream转发请求时发现upstream状态全都为down | 排查nginx的upstream的健康检查为什么失败 |
| 4 | upstream prematurely closed connection | nginx在与upstream建立完tcp连接之后,试图发送请求或者读取响应时,连接被upstream强制关闭 | 排查upstream程序是否异常,是否能正常处理http请求 |
| 5 | recv() failed (104: Connection reset by peer) while reading response header from upstream | nginx从upstream读取响应时连接被对方reset | 排查upstream应用已经tcp连接状态是否异常 |
| 6 | client intended to send too large body | 客户端试图发送过大的请求body,nginx默认最大允许的大小为1m,超过此大小,客户端会受到http 413错误码 | 调整请求客户端的请求body大小;调大相关域名的nginx配置:client_max_body_size; |
| 7 | upstream sent no valid HTTP/1.0 header | nginx不能正常解析从upstream返回来的请求行 |